
For many people, back pain is just a regular part of life. In fact, 80 percent of Americans will experience back pain at some point, according to the U.S. National Library of Medicine. At the risk of sounding like a total Negative Nancy, the aches and pains tend to get worse as we grow older. You've probably noticed that yourself.
There are a handful of reasons back pain is more common with age, says Vikash Sharma, PT, DPT, OCS, a physical therapist at Perfect Stride Physical Therapy.
Video of the Day
Video of the Day
"As we age, there are normal physiological changes that happen to the spine," Sharma says. "These changes can include a reduction in bone density, a reduction in the space between vertebrae as the discs lose water volume, arthritis and spinal stenosis, which is a narrowing of the area around the spinal cord and nerves," he explains.
You also lose muscle mass as you get older and/or may not be as mobile as you once were. All of these changes can reduce your back's ability to handle the demands you place upon it at the gym and in everyday life, Sharma says.
You may need to modify movements or activities you're used to, but staying active can help you both manage chronic back pain (defined as lasting longer than 12 weeks, according to the National Institute of Neurological Disorders and Stroke) and reduce the risk of injury or acute pain (which typically lasts just a few weeks), he says.
Below, Sharma shares six back exercises that will get your spine and the surrounding areas moving gently, increasing mobility, stability and blood flow.
Tip
If any of the movements below make your back pain feel worse, stop doing them and talk with a movement specialist — like a physical therapist — before trying them again.
Move 1: Lumbar Cat-Camel
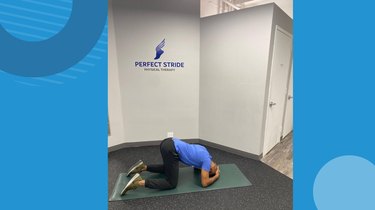
- Begin on your hands and knees.
- Bring both your elbows and head down to the floor. Place your hands behind your head and the top of your head on the floor.
- Slowly tuck your tailbone under and round your lower back.
- Then, slowly lift your tailbone up and back toward the ceiling and press your belly toward the floor as you arch your lower back. That's one rep.
- Complete 15 to 20 reps and repeat three to four times a day.
Tip
“This exercise is great because it helps to localize the motion toward the lumbar spine more than your conventional cat-camel,” Sharma says. “By focusing on getting the lower back moving, you will get increased blood flow, nutrients and lubrication into the joints, all of which can help improve movement and reduce pain.”
If you're new to this movement, start with fewer reps and build up until you are able to get better lower-back control and motion.
Move 2: Supine Trunk Rotation
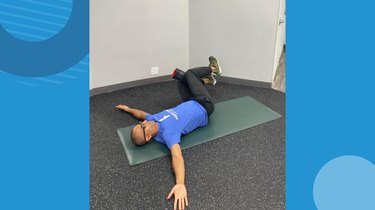
- Lie face-up on an exercise mat. Lift your legs off the ground with your knees bent at 90 degrees into a tabletop position. Squeeze a small foam roller, yoga block or similar object between your knees. Extend your arms out to the sides so that they are perpendicular to your body.
- Keep your legs in this position as you slowly drop them down to one side as far as you can while keeping the opposite shoulder blade on the floor.
- Once you've lowered as far as you can while keeping your opposite shoulder down, use your abs to bring your legs back to center.
- Repeat on the other side. That's one rep.
- Complete 2 sets of 15 reps.
Tip
“This exercise is awesome to introduce some controlled rotation into the spine and also activate the trunk muscles responsible for rotation,” Sharma says.
If this feels too challenging, try it first with your legs placed against a wall for added support.
Move 3: Prone Press-Up
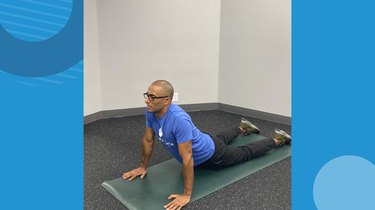
- Lie on your stomach on an exercise mat with your palms planted at chest level.
- Using only your upper body, push yourself up so your elbows are straight (or as close to straight as you can get).
- At the top, exhale, squeeze your glutes and press the front of your hips gently into the ground to stretch your spine a bit more.
- Complete 10 reps, three times a day.
Tip
“This one is a mainstay in the lower-back rehab toolkit,” Sharma says. While it may be effective for some people, it won’t be right for everyone. If you notice this movement makes your symptoms worse, stop doing it and talk to a physical therapist or another movement specialist before trying it again.
Move 4: Pallof Press
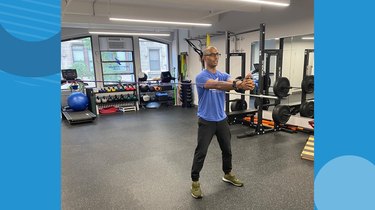
- Anchor a resistance band around a sturdy piece of furniture or gym equipment at chest height. Holding the handle, step away from the anchor point and hold the band with both hands at your chest.
- As you exhale, push the band away from your chest and straighten your arms out in front of you. You should feel the resistance from the band trying to pull you back toward the anchor point. Engage the stabilizing muscles in your core to hold this position.
- Slowly bend your elbows and bring the resistance band back toward your chest, making sure to keep your core engaged and resisting the urge to rotate your torso.
- Complete 3 sets of 10 reps.
Tip
You can make this exercise more challenging by holding your arms extended for longer. Or, scale it back by trying it in a kneeling position, instead.
Move 5: Side-Lying Hip Axial Rotations
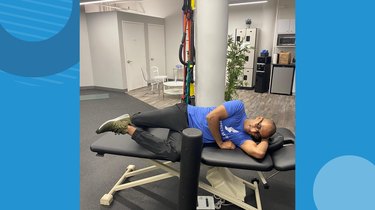
- Lying on your side on a raised surface (like a couch, bed, bench or table), bend your top knee so that the bottom of your foot points behind you. Let your bottom leg hang off the surface from the knee down.
- Stand a foam roller on the ground so that you can touch it with your bottom knee.
- Lower your bottom ankle down as you internally rotate at the hip.
- Then, lift your bottom ankle up as high as you can as you externally rotate the hip. Try to maintain contact between that bottom knee and the foam roller throughout.
- Complete 2 sets of 12 reps.
- Repeat on the other side.
Tip
Hip function is surprisingly important for getting rid of low-back pain, Sharma says. “If the hips are not functioning as they should, you will find that the spine and pelvis will begin to move differently and compensate for this lack of hip motion,” he explains.
Move 6: Diaphragmatic Breathing
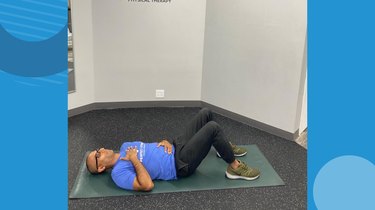
- Lie face-up on an exercise mat and place one hand on your upper chest and the other on your abdomen.
- Take a deep breath in through your nose, slowly and calmly. You should feel your bottom hand lift up as you inhale and the upper hand move just slightly toward the end of the breath.
- Exhale through your nose, keeping the breath quiet. Feel your belly go down.
- Aim to do this breathing exercise for 2 to 3 minutes three times a day.
Tip
Sharma calls this a “low-hanging fruit” when it comes to pain. Pain typically causes the breathing to change and the body to tense in reaction to the discomfort. Breathing deeply helps to calm down the nervous system and reduce pain perception, he says.