It may come as a surprise, but grip strength is one of the most important measures of overall health. Defined as "the amount of force you have when you clench your hand around an object," according to the Cleveland Clinic, it's a marker of chronic disease risk, immune system health, mental health and even how long you might live.
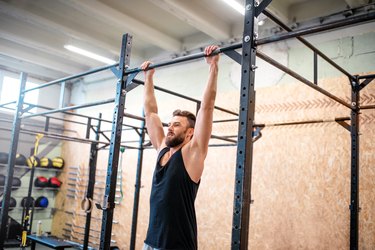
The dead hang — an exercise in which you hang from a bar overhead with your arms fully extended, your body in a straight line and your feet off the ground — is one metric that can be used to measure how much grip strength you have and also improve it.
Video of the Day
But if you've tried dead hangs before and couldn't hold on to the bar for more than a few seconds — or you're reading this and thinking there's no way you'd even be able to do a dead hang at all — don't fret!
We've compiled a list of reasons you might not be able to hang on to the bar for long during your head hang — plus exercises you can do to help.
You Have Poor Grip Strength
One of the main reasons you may struggle to hold on to the bar for very long during your dead hang is weak grip strength. Your forearm muscles dictate how strong your grip is (or isn't). To strengthen your forearms — and therefore improve your grip strength — add the following exercises into your routine.
1. 4-Way Wrist Curl
- Kneel in front of an exercise bench with a light weight plate in each hand, the backs of your forearms resting on the bench and elbows bent at 90 degrees. Your hands should hang off the back of the bench.
- Curl both wrists upward, then lower them to return to starting position. Repeat this three times.
- Flip your arms over so your forearms are resting on the exercise bench. Your hands should hang off the back of the bench.
- Curl both wrists upward, then lower them to return to starting position. Repeat this three times.
- Rotate your arms so the outer sides of your forearms are resting on the exercise bench. Your palms should face each other. Your hands should hang off the back of the bench.
- Move your wrists up and down. That's 1 rep. Repeat this three times.
- Keep your forearms in the same position. Rotate your right wrist out to the right and your left wrist out to the left. Both palms should now be facing up. Rotate your right wrist in to the left and your left wrist in right. Both palms should now be facing down. That's 1 rep. Repeat this three times.
2. Farmer's Hold
- Stand upright with feet hip-width apart.
- Hold a weight plate in your right hand and a dumbbell in your left hand.
- You should feel tension in your forearms.
- After a few seconds, switch the weight plate to your left hand and the dumbbell to your right hand.
- Repeat.
3. Suitcase Hold
- Stand upright with feet hip-width apart.
- Hold a dumbbell in your right hand.
- You should feel tension in your right forearm.
- After a few seconds, switch the dumbbell to your left hand.
- Repeat.
4. Plate Pinch Rotation
- Stand upright with feet hip-width apart.
- Grip the edge of a weight plate with your fingers — the weight plate should be flat against your thighs.
- Lift your right hand off the weight plate and move it to the left. Return your right hand to grip the weight plate.
- Lift your left hand off the weight plate and move it to the left. Return your left hand to grip the weight plate.
- Continue rotating the weight plate to the left.
- Then, rotate the weight plate to the right.
You Have Weak Back Muscles
Another contributing factor to not being able to hold a dead hang is a large back muscle known as the latissimus dorsi ("lats" for short). To do a dead hang, you need to activate your lats, so if this muscle is weak, the exercise may be hard to do. To strengthen your lats, add the following exercise into your routine.
1. Inverted Row
- Place a barbell on a squat rack with the bar at chest height or a little below.
- Grip the bar with your palms facing away from you and walk your feet out so your body forms an acute angle with the floor. Smaller, steeper angles will be more challenging than larger angles where your body is more upright. Dig your heels into the ground and point your toes up to the ceiling.
- Keep a plank position as you lower your body away from the handles or bar. There should be a straight line running from your heels through your hips and shoulders. Lower your body until your arms are straight.
- Finish the rep by pulling your body back up. Pull until your sternum touches the bar. Keep your shoulders down and don't shrug.
- Repeat.
You Have Weak Core Muscles
Your core (which includes both your abdominal muscles and low back muscles) also plays a big part in the ability to perform a dead hang because your core muscles attach the upper half of your body to your lower half. This is important because your core transfers forces between the two to help your entire body stay still and stable during the dead hang. To strengthen your core, add the following exercise into your routine.
1. Dead Bug
- Lie flat on your back with both arms reaching straight toward the ceiling.
- Lift your feet off the ground so your legs are bent at a 90-degree angle.
- Keep your lower back in contact with the floor through the entire duration of the exercise.
- Slowly and with control, extend one arm and the opposite leg away from each other.
- Move from the hip and the shoulder, keeping your spine steady.
- Keep your limbs long and low to the floor, forming a diagonal line.
- Lower your limbs as far as you can while keeping the lower back on the ground. Fight the impulse to arch your back by tightening your abs, pressing your bellybutton down to anchor your lower back to the floor.
- Exhale as you return your arm and leg to starting position with the same slow, controlled movement.
- Repeat with the other arm and leg, then return to center again. This counts as one rep.
2. Bird Dog
- Get on your hands and knees with your hands directly in line with your shoulder and knees in line with your hips.
- Look down at the floor and brace your core (tucking your tailbone just slightly) to create a straight line from the tip of your head to your tailbone.
- On an exhale, reach your left arm straight out in front of you until your upper arm is in line with your ear.
- Simultaneously reach your right leg straight behind you, fully extending your knee.
- Pause here for a moment.
- Reverse the motion and return to the starting position.
- Switch sides, reaching your right arm forward and raising your left leg back.
- Pause and then go back to the starting position.
3. Alternating V-Up
- Start lying on the ground with your legs extended and held together, arms above your head, elbows along your ears.
- Raise your torso and your left leg up off the ground.
- Reach your right hand toward your left leg.
- Lower your torso and left leg back down to the starting position.
- Raise your torso and your right leg up off the ground.
- Reach your left hand toward your right leg.
- Lower your torso and right leg back down to the starting position.
- Repeat, continuing to alternate sides.
4. Sit-Up With Weight Plate Overhead
- Start lying on the ground with your legs extended and held together, arms above your head holding a weight plate, elbows along your ears.
- Brace your core and lift your upper body off the ground as your raise all the way up to a sitting position. The weight plate should now be above your head.
- Once you are at the top, slowly lower yourself back down.
- Repeat.
You Have Weak Glutes and Adductors
Finally, weak glutes and adductors can contribute to the challenge of a dead hang. When you're doing a dead hang, squeezing your hips and glutes during the duration of it is important so your body doesn't swing. Keeping these muscles braced will help you hold the move longer. To strengthen your glutes and adductors, add the following exercise into your routine.
1. Kickback to Fire Hydrant
- Start on all fours with your wrists below your shoulders and your knees below your hips.
- Keeping your hips square to the ground and your knees bent at a 90-degree angle, squeeze your glutes to lift your right foot toward the sky as if you are stamping the bottom of your shoe on the ceiling.
- Keep your core tight and don’t arch your back.
- Inhale as you lower the leg back down.
- Repeat this two more times.
- Lift your right knee to the right toward your hip. Stop at hip height or as high as you can comfortably.
- Lower your knee to the starting position.
- Repeat this two more times.
- Do the same thing — three kickbacks and three fire hydrants — on your left leg.
2. Medicine Ball Adductor Wall Sit
- Stand with your back pressed firmly against a wall and your feet hip-width apart and a foot or two in front of you. Squeeze a medicine ball between your thighs.
- Keeping your back pressed into the wall, slide down and bend your knees until your thighs are parallel to the floor. Your ankles should be directly under, or in front of, your knees. Place your hands on your lap or in front of your chest. (Don't cheat by pressing your arms into the wall.)
- Tighten your core, press your lower back into the wall and squeeze the medicine ball between your thighs. Hold this seated position for as long as possible.
- Once you’re ready to end your set, slide up the wall to return to standing.
3. TRX Row With Medicine Ball
- Adjust the TRX handles to waist height.
- Place a medicine ball in between your thighs and squeeze your thighs together so the medicine ball doesn't fall down.
- Grab the handles or bar and walk your feet out so your body forms an acute angle with the floor. Smaller, steeper angles will be more challenging than larger angles where your body is more upright. Dig your heels into the ground and point your toes up to the ceiling.
- Keep a plank position as you lower your body away from the handles or bar. There should be a straight line running from your heels through your hips and shoulders. Lower your body until your arms are straight.
- Finish the rep by pulling your body back up. Pull until your elbows are even with your sides.
- Repeat.
4. Heels-Elevated Glute Bridge
- Lie on your back with your arms resting by your sides, knees bent and heels resting on a box or bench in front of you, hip-width apart.
- Squeeze your glutes and core, and press your heels into the box or bench to drive your hips up toward the ceiling until you form a diagonal line from knees to hips to chest. Resist the urge to arch your lower back as you raise your hips. Focus on keeping your spine in a neutral position throughout.
- Hold this position for a few seconds with your glutes engaged.
- Slowly lower your hips back down to the ground and reset in the starting position for a second before lifting back up.
- Repeat.
5. Heels-Elevated Leg Lift
- Lie on your back with your arms resting by your sides, legs straight and heels resting on a box or bench in front of you, hip-width apart.
- Squeeze your glutes and core, and lift your right foot off the box or bench a few inches.
- Lower your right foot back down on the box or bench.
- Squeeze your glutes and core, and lift your left foot off the box or bench a few inches.
- Repeat, alternating legs each rep.
You May Need to Change How You Hold the Bar
Another suggestion for improving your dead hang is to try multiple grip variations. Below are a few different options you can try.
1. Pronated Grip
A pronated grip is when your palms are facing away from you. This is the same grip you'd use if you were doing a pull-up. This grip relies mostly on your forearm and lat strength and is the most difficult way to hold a bar.
2. Supinated Grip
A supinated grip is when your palms are facing in toward you. This is the same type of grip you'd use if you were doing a chin-up. This grip relies mostly on your biceps, but your lats and forearms are involved too. This grip reduces the strength needed in your lats because your biceps are doing a lot of the work. This grip is normally easier than a pronated grip.
3. Mixed Grip
A mixed grip is when one palm is facing in toward you and the other palm is facing away from you. This alternated hand position may make you feel more "locked-in" and secure on the bar.
4. Closed Grip
A closed grip is when your palms are facing away from you, your fingers are wrapped around the top of the bar and your thumb is wrapped underneath the bar. This is the safest grip choice and it best maximizes your grip strength.
5. Open Grip
Also called a false or thumbless grip, this is when your palms are facing away from you and your fingers and thumb are all wrapped around the top of the bar. This type of grip is harder than the closed grip because you don't have your thumb wrapped underneath the bar for more security.
6. Hook Grip
A hook grip very similar to a closed grip where your palms are facing away from you, your fingers are wrapped around the top of the bar and your thumb is wrapped underneath the bar. The difference, however, is your thumb is wrapped so far underneath the bar that you can grab it with your index and middle fingers. This locks your thumb under your fingers to further promote security during the dead hang, but it can be uncomfortable at first.
Was this article helpful?
150 Characters Max
0/150
Thank you for sharing!
Thank you for your feedback!


