

Resistance bands are inexpensive, versatile and easy to store — plus they deliver. This challenge builds full-body strength using only bands. Get all the details on the challenge here.
Your back muscles can be tricky to target without access to a gym — unless you have resistance bands handy. Unlike with body-weight or even dumbbell exercises you might be able to do at home, a resistance band can mimic a cable machine for a lot of exercises.
Peter Marino, CPT, certified personal trainer and owner of Posh Fitness, an online personal training platform, created this resistance band back workout as part of our 4-Week Resistance Band Challenge so you can strengthen your back muscles anywhere. He even added some core and biceps work — and that's absolutely intentional.
Video of the Day
"It's more efficient to work out the biceps after back, because the muscle is already fatigued from performing back exercises that involve the biceps," he says. Because your biceps are a strong, frequently used muscle, you'll be able to engage them throughout the whole workout, rather than isolating them only at the end. This more closely mimics how they work in everyday life.
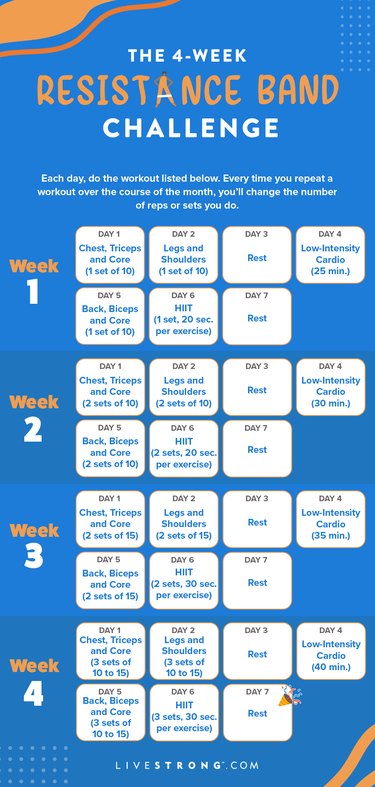
If you're doing the challenge, follow the weekly rep scheme below. If you're doing this workout on your own, increase or decrease the reps and sets based on your fitness level. You should be able to finish all the reps with good form, but the last two should feel challenging.
Ideally, there will be tension on the band before you start any exercise. The exercise should then get progressively harder as you move through the range of motion until the middle of the exercise when the band — or you — feels close to the limit (but not at the limit).
Try This Resistance Band Back, Biceps and Core Workout
For this workout, you'll need a long loop band (a mini band is optional on the last exercise). One with handles can also work. If you have a different type of band, check out the modifications below the exercise.
Start with a quick warm-up of light cardio. Aim for 2 to 5 minutes of walking in place, jumping jacks and/or dynamic stretches.
Then you'll do the exercises in each round below back-to-back. In between rounds, rest for 30 to 45 seconds. For Week 2 and beyond, finish all the sets for each round before moving onto the next round. You won't feel fully rested (like you were before your workout), but you should feel ready to tackle the next round.
Sets and Reps Per Exercise
Sets | Reps | |
|---|---|---|
Week 1 | 1 | 10 |
Week 2 | 2 | 10 |
Week 3 | 2 | 15 |
Week 4 | 3 | 10 to 15 |
Round 1
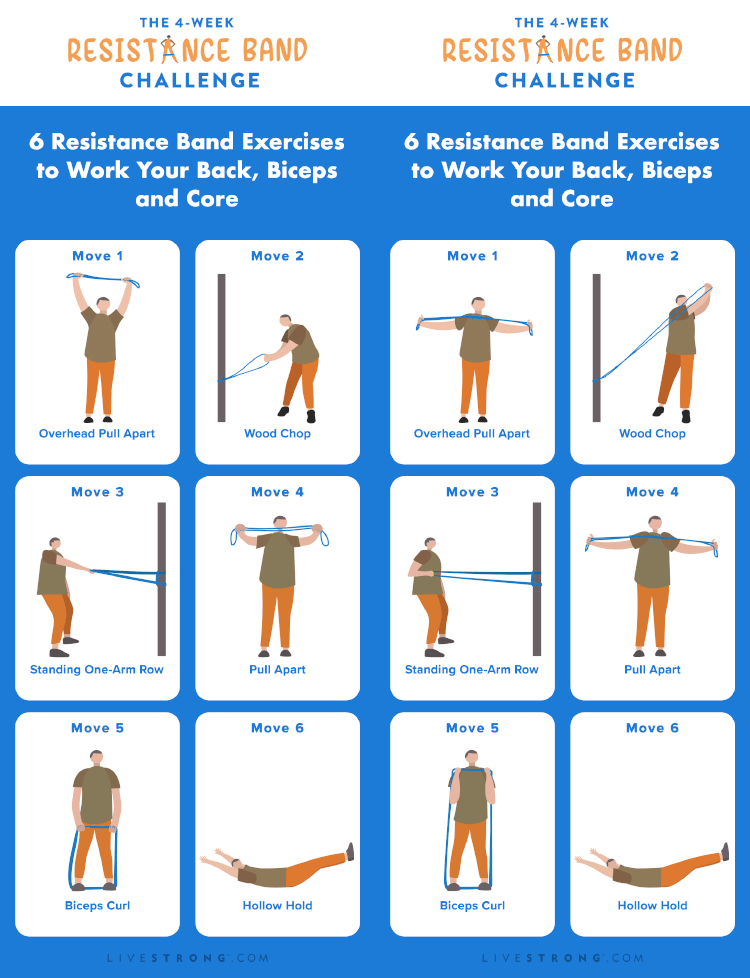
1. Overhead Pull Apart
- Stand with your feet hip-width apart and your knees soft (rather than locked).
- Hold a resistance band with one hand near each end, at a comfortable shoulder-width distance apart.
- Reaching your arms straight overhead with your palms facing forward, pull your shoulders back and down to activate your back muscles.
- While maintaining the shoulder blade retraction, pull the band apart and out to the sides (like a T) at the same speed and force with both arms at the same time. You may need to position your head back farther to avoid being hit by the band.
- Pull as wide as your mobility (and the band) allows while maintaining your posture. Ideally, the middle of the band would rest on your chest.
- Hold the extended position for one breath, then slowly release the band back up to the top position.
To use a band with handles, fold the band in half, then grab one end in each hand.
2. Woodchop
- Loop a resistance band around an anchor at ankle height or on the floor.
- Stand with your right side closer to the anchor, far enough away so there's tension on the band. Stand with your feet shoulder-width apart and bend your knees slightly.
- Hold the band with both hands at your right side and turn slightly toward that side.
- Twist your arms up and to the left, traveling in a diagonal from where they started.
- Slowly lower your arms back down to the starting position.
- Do all your reps on one side, then repeat on the other.
This one really is a total core move — working your back just as much as your abs. So make sure you keep your torso strong and stable to protect your spine.
Round 2
3. Standing One-Arm Row
- Loop a resistance band around a sturdy object like a staircase banister or power rack frame, or attach it to a resistance band door anchor.
- Grip the band with one hand and step back until your arm is extended in front of your torso, about chest-height.
- Set your feet shoulder-width apart and bend slightly at the knees.
- Pull the band into your midsection just below your chest, drawing your shoulder blades together. Keep your elbow close to your side.
- Pause briefly, and then let your arm extend again.
- Do all your reps on one side before switching arms.
For a band with handles, wrap the band around an anchor at chest height and hold both handles in one hand.
4. Pull Apart
- Stand with your feet hip-width apart and your knees soft (rather than locked).
- Hold a resistance band with one hand near each end, at a comfortable shoulder-width distance apart.
- Reaching your arms straight forward with your palms facing down, pull your shoulders back and down to activate your back muscles.
- While maintaining the shoulder blade retraction, pull the band apart at the same speed and force with both arms at the same time.
- Pull as wide as your mobility allows while maintaining your posture.
- Hold the extended position for one breath, then slowly release the movement back to the starting position.
To use a band with handles, fold the band in half, then grab one end in each hand.
Though this move is similar to the overhead pull apart, you're targeting your back muscles from a different angle by using them to move your shoulder blades in different ranges of motion.
While the overhead pull apart focuses on downward and upward rotation of your shoulder blades, the standard pull apart emphasizes protraction (moving apart) and retraction (drawing together). And that's important because you're not just moving in one direction in life.
Round 3
5. Biceps Curl
- Step on the middle of a long band, feet hip-width apart.
- Grab the other end with both hands, palms facing up and in front of your thighs. The band will be in a square shape.
- Pull the band up toward your shoulders.
- Lower your arms back down to the starting position.
Using a band with handles? Hold a handle in each hand and make sure you eliminate any slack in the band at the starting position by putting more of the band under your feet.
6. Hollow Hold
- Lie on your back on the floor or on an exercise mat and press your lower back down into the ground.
- Squeeze your bellybutton down toward the floor to activate your abs. Make sure your legs are straight and feel glued together as you gently lift them up off the ground.
- Float and extend both arms overhead. Gently raise your head and shoulders off the floor, keeping your upper arms by your ears.
- Keeping your lower back flush against the floor, hold this position for 10 to 15 seconds, thinking about pulling your bellybutton into the ground.
For a more beginner-friendly version, you can bend your knees slightly, take pauses whenever you need to or keep your arms along your sides.
To make this move more challenging, you can loop a mini band around your wrists and keep tension in the band as you hold.
Follow Along With the Challenge
Use the calendar below to help you stay on track with the 4-Week Resistance Band Challenge. Do the workout (or rest day) listed, then check off each day as you complete it. (Get a printer-friendly version here.)
Back to the 4-Week Resistance Band Challenge