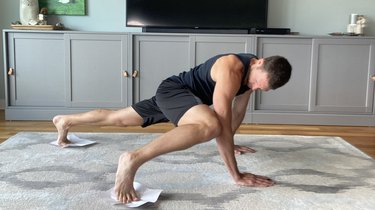
One thing The Great Quarantine of 2020 has taught us is you don't need to hit the gym or buy fancy equipment to sculpt and strengthen every major muscle — including your abs. You can work out anywhere and use almost anything... even something as simple as a piece of paper.
You've probably heard about or seen people using workout sliders. Even if you don't have them (and can't find them online), you can replace them with a piece of paper. Whatever sliders can do for your abs, paper can replicate.
Video of the Day
Video of the Day
"Sliders are an amazing tool for abdominal work, but if you don't have one, you can simply grab a paper plate, cardboard or two pieces of paper," says Joey Thurman, certified personal trainer and founding master trainer at Kuudose, an online workout platform.
Sure, it sounds playful and silly, but you'll be pleasantly surprised at the results. "Being creative with your abdominal work will take your training to the next level because using a new piece of 'equipment' won't only stimulate the body, but your mind also," Thurman says.
Check out more of our 20-minute workouts here — we’ve got something for everyone.
Try This 20-Minute Paper-Powered Ab Workout
First off, to get the most out of this workout, it's important to perform the following moves in the exact order listed below. That's because each move gets your body ready for the next one.
"If you prime your body for the work, you will be more efficient with your movements, limit injury and get much more out of the workout itself," Thurman says. After completing the first round, you should be properly warmed up.
Do: each of the following exercises in order, resting up to 30 seconds in between. Repeat the circuit as many times as possible in 20 minutes, resting up to 2 minutes between rounds.
Move 1: High Plank In and Out
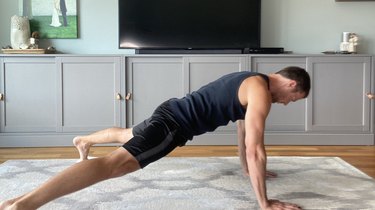
- Start in a high plank with your hands underneath your shoulders and your toes on a piece of paper.
- Stay flat from head to hips to heels, think about squeezing your butt and slightly tucking your tailbone into a forward tilt.
- Slide your feet as wide as you can while maintaining proper plank form.
- Once you get as far out as you can, pull your legs back in, initiating the movement from your adductors (inner thighs).
- Keep this movement slow and controlled for 30 to 60 seconds (about 15 to 20 reps), depending on your fitness level and core strength.
Tip
If you only have one piece of paper, you have two options: 1. Do all your reps on the same side before switching. 2. Switch the paper from foot to foot with each rep.
Move 2: Ab Slider
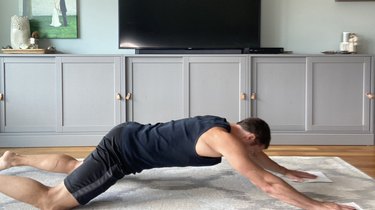
- Kneel on a yoga mat or pad for comfort. Place both hands on the paper (either both hands on one piece or each hand on a separate piece) on the floor.
- Straighten your arms and keep your elbows locked throughout the move. Tuck your tailbone and tighten the abs.
- Slide your hands out in front of you slowly, keeping the paper in line with your head (for one piece) or with your shoulders (for two pieces).
- Extend to the point where you can't go further without losing good form.
- Pause, then slide back by pulling from your abs and not your arms.
- Aim for 5 to 10 reps.
Tip
Don't arch your back or hyperextend your hips. Think of this as a kneeling crunch and flex your abs as you begin to return to your starting point.
Move 3: Single-Arm Slide Out
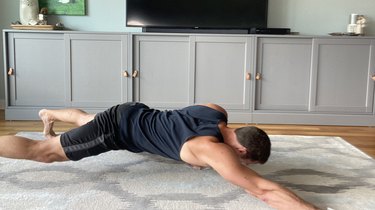
- Start in a high plank with each hand on a piece of paper.
- Brace yourself through the abs, squeeze your glutes and stay loaded through the shoulders.
- Slowly start to reach one arm out in front of you as if you were raising your hand in class.
- While reaching out the arm, simultaneously bend the opposing elbow to lower down into a one-arm push-up.
- Push through the palm of the bent arm as you slide the extended arm back to your starting position (high plank).
- Take a deep breath and repeat on the other side.
- Aim for 3 to 6 reps on each side.
Tip
Again, if you only have one paper slider, you can either do all your reps on the same side before switching or pass the paper from hand to hand with each rep.
Move 4: Spiderman Plank
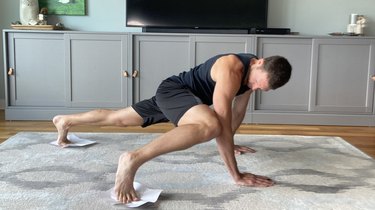
- Start in a high plank with your hands underneath your shoulders and each foot on a piece of paper.
- Brace your core and bend your knee to drive it toward the same-side elbow. Stay as solid as possible through your core and imagine crunching to the side (your obliques).
- Go as far up as you can with good form.
- Slide your foot back and return to a high plank, then repeat on the other side.
- Aim for 10 to 15 reps on each side.
Tip
For more of a challenge, complete all your reps on one side before switching to do all your reps on the other.
Move 5: Rotational Double-Leg Knee Tuck
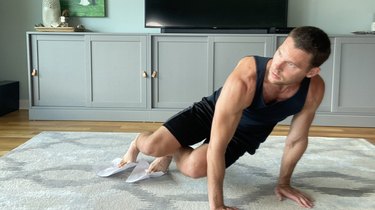
- Start in a high plank with your hands beneath your shoulders and your toes on paper (one or two pieces).
- Pull your knees up and over toward one side of your body, rotating your hips while keeping them high.
- As you pull in, think about drawing in your abs and tucking your tailbone.
- Slide up as far up as you can, then pause briefly.
- Return to the starting position and switch sides.
- Aim for 10 to 15 reps on each side.
Tip
As with the Spiderman plank, you can opt to do all your reps on one side before switching.
Move 6: Plank Reach Back
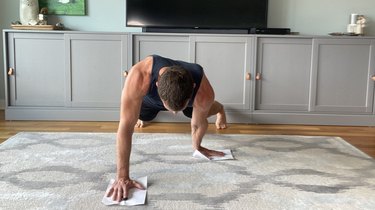
- Start in a high plank with each hand on a piece of paper. Root your toes into the floor and brace through your shoulders and chest.
- Slide one hand back toward the same side knee and come as far back as you can while maintaining a neutral spine.
- Return to a high plank and repeat on the other side.
- Aim for 10 to 20 reps on each side.