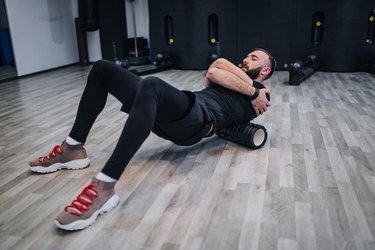
You're probably familiar with foam rolling as a post-workout recovery aid to help decrease muscle tightness and tension. But did you know this sturdy little cylinder can also double as a strength-training tool?
"Foam rollers, when used in strength workouts, can act similarly to a stability ball," says K. Aleisha Fetters, CSCS, certified strength and conditioning specialist and author of Fitness Hacks for Over 50.
Video of the Day
Video of the Day
Because of their round, unstable design, they challenge your balance and up the ante on your core and stabilizing muscles, thus making you work much harder during workouts, Fetters says. Since they're easy to roll, you can even use them as at-home alternatives for ab rollers and Pilates reformers.
What's more, "in some exercises, they can work really well for giving your body external, tactile cues," Fetters says. For instance, try a dead bug, then do the same move with a foam roller braced between one hand and knee. "There's a massive difference in terms of core recruitment since the roller forces and teaches you to really engage your core," she says.
Check out more of our 20-minute workouts here — we’ve got something for everyone.
20-Minute Strength Workout Using Just Your Foam Roller
Ready to roll? Designed by Fetters, this 20-minute full-body routine utilizes a foam roller in unexpected ways to challenge your stability and strength.
Do: each move for as many reps as possible with good form back to back with minimal rest in between. Cut your set if your form starts to suffer or you reach an 8 on the rate of perceived exertion scale (10 is the highest). Repeat for a total of 3 to 4 rounds, resting 2 minutes between each.
Move 1: Ab Rollout
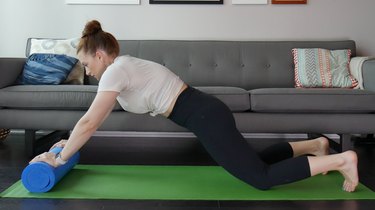
- Get on the floor in a high plank on your knees with your hands on top of the roller.
- Brace your core to tuck your tailbone and focus on holding this position throughout.
- Walk/roll your hands forward as far as you can while maintaining this flat-back position. Don't arch your lower back.
- Pause, then roll back to the start.
Move 2: Push-Up
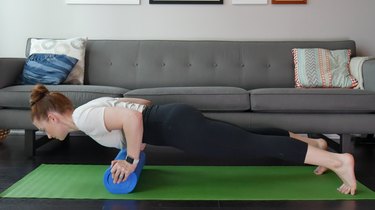
- Get on the floor in a high plank with your hands on the edges of the roller (this makes for a more comfortable wrist position) and directly beneath your shoulder blades.
- Pull your shoulders down and away from your ears by squeezing your lats (upper-back muscles).
- Brace your core to tuck your tailbone, squeeze your glutes and focus on holding this position throughout.
- Bend at the shoulders and elbows to lower as far as you can while maintaining this flat-back position. Don't let your lower back arch.
- Try to keep your forearms as vertical as possible as you lower and let your elbows flare diagonally from your body.
- Pause, then drive through your hands to press back up to the start.
Move 3: Side Plank
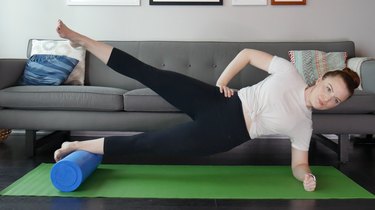
- Lie on your side on the floor with a roller under your ankles (you can stack or stagger them) and your bottom elbow directly below your shoulder, forearm on the ground.
- Squeeze your core and glutes to raise your hips to form one straight line with your body.
- From here, raise your top leg toward the ceiling, pause, then lower back to the plank. Focus on keeping your hips up throughout and not collapsing into your bottom shoulder.
- Repeat for as many reps as you can with good form, then switch sides.
Move 4: Hamstring Walk
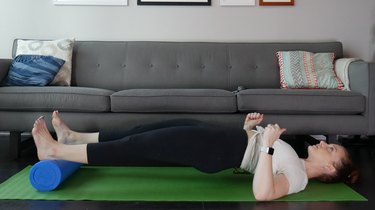
- Lie on your back on the floor and place the bottoms of your feet on top of the roller.
- Brace your core, drive through your heels to raise your hips to form a straight line.
- Roll/walk your feet out away from your body, focusing on keeping your hips fully extended.
- Pause, then roll/walk your feet back to start.
Tip
Only go as far as feels okay, as this works the hamstrings pretty intensely. You can lower your hips between reps or keep them raised throughout.
Move 5: Glute Bridge

- Lie on your back on the floor and place your heels on top of the roller.
- Brace your core, squeeze your glutes and drive through your heels to raise your hips up to form a straight line.
- Focus on keeping your glutes maximally contracted, then lower back down.
Tip
The roller will take some engagement out of the glutes and put the emphasis on your hamstrings to stabilize. You'll also get a bit more core engagement.
Move 6: Reverse Lunge
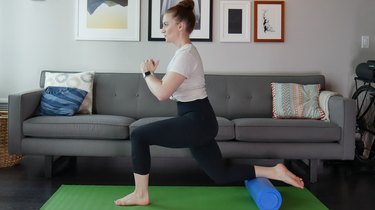
- Stand tall with the top of one foot on the roller. Brace your core to minimize the arch in your lower back, keep your chest up and shoulders back.
- Bend your front knee to lower into a lunge, letting your bottom leg roll behind you and the roller roll toward your knee.
- Pause, then drive through your front foot to return to start.
- Repeat for as many reps as you can with good form, then switch sides.
Tip
You can vary how much weight you put into the back leg to make things lighter or heavier on your front leg.