Maintaining a strong and flexible body is essential for everyone, and yoga can be a great way to do that at any age. But if you have osteoporosis, a yoga practice requires careful consideration — and consultation with your doctor — of poses to embrace and poses to avoid.
"In general, avoid poses that require you to rotate your spine (twisting poses), poses that require you to flex your spine (bending forward and rounding your spine) and poses that require side bending," Tara Salay, PT, DPT, RYT-500, physical therapist and yoga teacher, tells LIVESTRONG.com
Video of the Day
Instead, stick to poses that maintain a relatively neutral or straight spinal position throughout.
Warning
People with low bone density and/or osteoporosis should talk to their doctor before starting a yoga practice. They should also chat with their yoga teacher before class about their condition or work with a certified instructor to find safe poses.
Is Yoga Good for Osteoporosis?
Yes! If you have osteoporosis, you should know that yoga can help prevent and reverse bone loss, according to the National Association of Orthopaedic Nurses.
Certain poses cause muscles to pull on the bones they attach to. In turn, this stimulates cells called osteoblasts to build bone strength in these potentially weaker areas.
Yoga can also helps improve your balance, lessening your risk of a fracture-inducing fall.
"People with osteoporosis have decreased bone mineral density, which puts them at increased risk of fractures," Carolyn Wright, PT, DPT, yoga teacher and physical therapist with Bespoke Treatments in San Diego, tells LIVESTRONG.com.
"Yoga can improve balance, mobility, strength and coordination. These benefits lead to decreased risk of falling and fractures."
Tip
"If you are just starting a yoga practice, it may be wise to start with private lessons, semi-private lessons or smaller class sizes to receive more individualized guidance on the poses," Wright says.
"And take slower paced yoga classes so that you can focus on proper form and breathing (like Hatha, Iyengar or restorative yoga)."
5 Bad Yoga Poses for Osteoporosis and Poses to Do Instead
Here are five poses that should be avoided with osteoporosis —- and what poses you can swap in.
1. Plow Pose (Halasana)
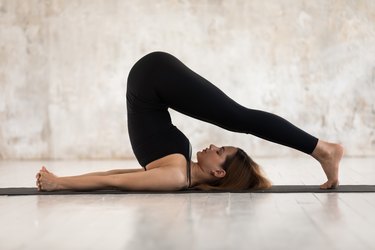
Plow pose is done by lying on your back and lifting your hips toward the ceiling as you attempt to bring your toes over your head and onto the floor.
However, "aggressive spinal flexion poses may increase risk of compression fractures," Wright says. And depending on the severity of your osteoporosis, you may even want to avoid mild spinal flexion poses as well, she says.
Do Sphinx Pose Instead
Sphinx Pose (Salamba Bhujangasana)
- Lie on your stomach, legs together and extended straight behind you and feet pointed.
- Bend your elbows to 90 degrees and place your palms on the floor directly under your shoulders.
- Keep your hands and forearms flat on the ground, and press your forearms into the ground, lifting your head and opening your chest.
- Align your elbows with your shoulders and, if it feels good, spread your fingers wide.
- Inhale and exhale slowly as you pull your chest forward.
2. Seated Spinal Twist (Marichyasana)
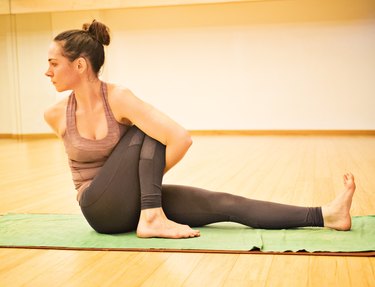
The seated twist pose is a deep twist, often with legs crossed, done by twisting your torso to the side. This type of pose, which facilitates end-range spinal rotation, is also not appropriate for individuals with osteoporosis.
This is because twisting motions place excessive pressure on the spine and can increase the risk of fracture.
Do Supine Bound Angle Instead
Instead, Salay recommends that you try supine bound angle. Just make sure to avoid forcing your hips to the end of their range of motion by supporting your knees with blocks, bolsters or blankets.
Supine Bound Angle (Supta Baddha Konasana)
- Sit with your knees bent and feet together. Lie on your back with your arms out to the side.
- Keep your knees bent and bring the soles of your feet together.
- Allow your knees to fall out to either side as far as they can go.
- Place a yoga block, bolster, pillow or folded blanket under each knee. Only bend your knees as much as you can without pain or discomfort.
- Stay here for as long as you find comfortable and relaxing.
3. Seated Forward Fold (Paschimottanasana)
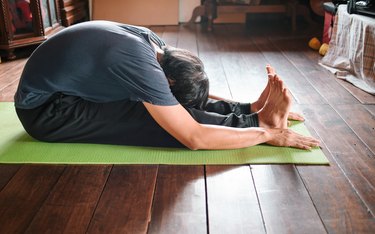
Seated forward fold is meant to improve hamstring flexibility and low-back range of motion. It's performed by sitting with your legs straight and reaching for your toes as you allow your back to round.
"But this puts a lot of pressure on the part of the spine where the bone density is usually weakest," Salay says.
Do a Supine Hamstring Stretch Instead
If improving your hamstring flexibility is your primary goals with this pose, lie on the ground with one leg straight along the floor and the other up in the air, holding onto that foot with a yoga strap, until you feel a pull in the back of the leg.
Otherwise, you can also substitute sphinx pose, Salay says. (See above for instructions.)
Supine Hamstring Stretch
- Grab a yoga strap or towel to help with flexibility and to make this pose a bit gentler on your body.
- Lie on your back and loop the strap around your right foot.
- Extend your left leg straight out.
- Bring your right thigh up to your torso with your knee slightly bent.
- Slowly straighten your knee and point your heel toward the ceiling until your leg is fully extended, foot flexed.
- Hold for 3 to 5 breaths before repeating with the other leg.
4. Wheel Pose (Urdhva Dhanurasana)
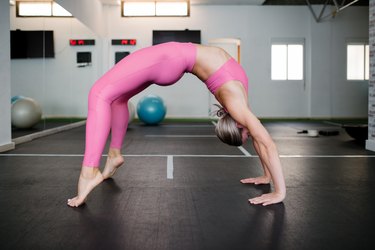
"Avoid aggressive backbend poses, such as wheel or bow, which can place increased compression on the spine," Wright says. "Instead, focus on mild backbends and chest openers, like restorative chest openers, bridge, baby cobra and sphinx."
Do Supported Chest Opener Instead
Supported Chest Opener
- From a sitting position, place a yoga block, bolster or a folded blanket under your middle and upper back and lie down. You can also place a pillow under your head to help keep your neck neutral.
- Extend your legs out straight and your arms out into a T, palms facing up.
- Breathe into each part of your body, particularly your chest.
5. Headstand (Shirshasana)
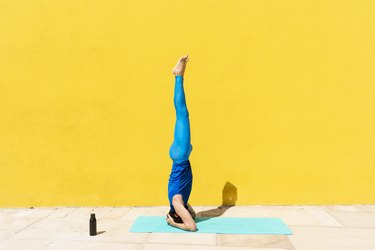
One look at this yoga pose, and it's obvious why you should avoid it if you have osteoporosis.
"You should avoid inversions [like headstand], as they put a lot of pressure on the neck and spine," Salay says.
And if you haven't been previously practicing other inversions, it's not the time to start.
Do Legs Up the Wall Instead
"Avoid starting a new inversion practice which can place excessive stress through the spine and can lead to injuries if not performed safely," Wright says. "Focus on mild inversions, such as legs up the wall."
Legs Up the Wall (Viparita Karani)
- Sit with your right side against a wall.
- Gently turn your body to the right and bring your legs up onto the wall. Use your hands for balance as you shift your weight.
- Lower your back to the floor and lie down. Rest your shoulders and head on the floor.
- Shift your weight from side to side and scoot your sit bones close to the wall.
- Let your arms rest open at your sides.
- Hold for 3 to 5 minutes.
- To come out of this pose, slowly push yourself away from the wall and slide your legs down to the left side. Use your hands to press yourself back up into a seated position.
Other Yoga Poses for Osteoporosis
Keeping safe and injury-free relies on removing or modifying certain yoga poses, but keeping healthy and strong relies on the poses you do practice.
"Focus on poses that improve overall strength, such as warrior II, poses that involve bearing weight through your hands, like tabletop, and those that improve your balance, such as tree pose," Wright says.
Tip
"Yoga is much more than just a physical practice. Practices like meditation and mantra are also part of yoga," Salay says. "While these practices aren’t going to necessarily increase your bone density, they are still very beneficial for your overall well being."
Warrior II (Virabhadrasana II)
- From a standing position facing the long side of your mat, spread your feet 3 to 4 feet apart, turning your left foot out 90 degrees and your back foot in 45 degrees.
- Bend your front knee to 90 degrees and square your hips to the side (not toward your front foot).
- Lift your arms up so they're parallel to the ground.
- Hold for 5 to 10 breaths before switching sides.
Tabletop Pose (Bharmanasana)
- Lower down to the ground on all fours. Place a pillow or blanket under your knees if you need the extra cushion.
- Place your hands directly under your shoulders.
- Make sure your knees are directly under your hips.
- Actively press the floor away from you with your hands, while engaging your upper back muscles and not letting your shoulder blades come too far apart.
- Hold for 5 to 10 breaths.
Tree Pose (Vrksasana)
- Begin in mountain pose: Stand up straight with your spine in a neutral position. Roll your shoulders back and down with arms at your sides.
- Place your right foot on your ankle, shin or inner thigh (not on your knee). If needed, reach down with your right hand to help lift your foot.
- Square your hips forward and place your hands at heart center or above your head.
- Hold for 5 to 10 breaths before switching sides.
- Archives of Physical Medicine and Rehabilitation: "Postmenopausal Spinal Osteoporosis: Flexion Versus Extension Exercises"
- Osteoporosis International: "Too Fit to Fracture: Outcomes of a Delphi Consensus Process on Physical Activity and Exercise Recommendations for Adults with Osteoporosis With or Without Vertebral Fractures"
- Pain Practice: "Yoga Spinal Flexion Positions and Vertebral Compression Fracture in Osteopenia or Osteoporosis of Spine: Case Series"
- National Association of Orthopaedic Nurses: "Yoga and Bone Health"